-
[0417 복습] 딥러닝 심화_Roboflow 데이터셋 활용 실습, CNN 포함 모델링KT 에이블스쿨 복습 2024. 4. 17. 22:19
**셀프 복습용으로 작성한 것이라 실수가 있을 수 있습니다!
혹시 실수를 발견하시면 댓글로 알려주시면 감사드리겠습니다 :)
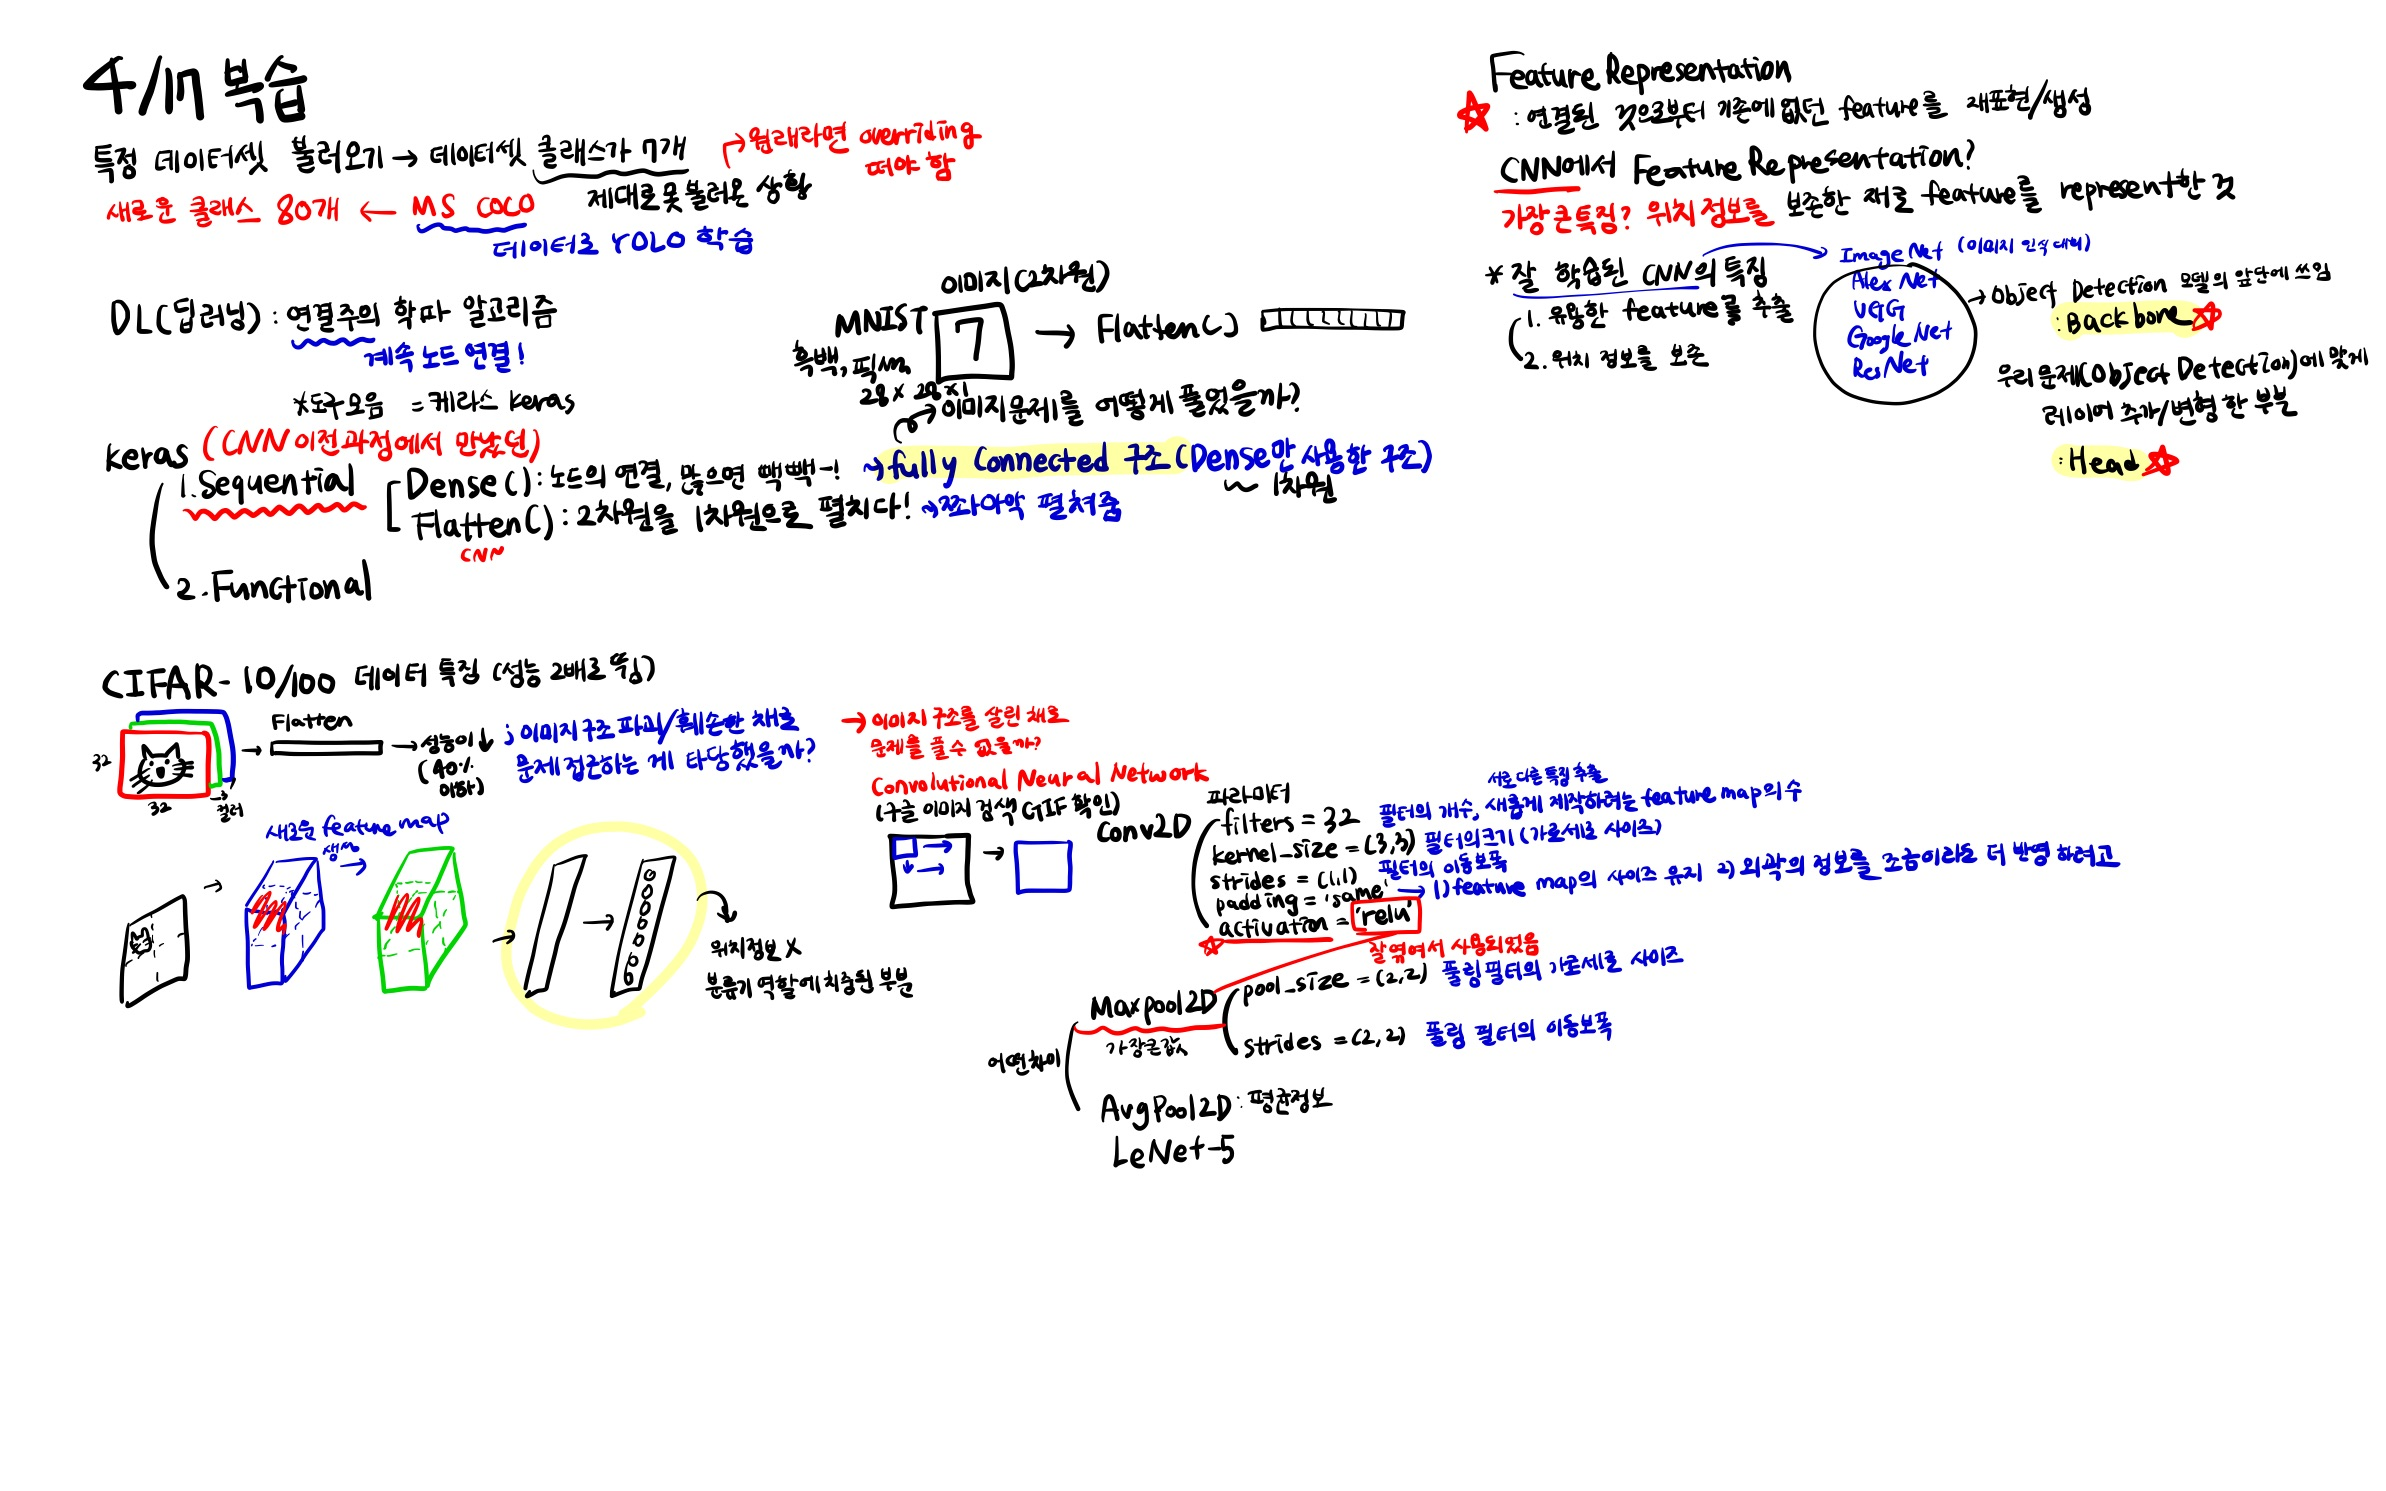
딥러닝 심화
Roboflow 오픈소스 데이터셋 사용
# 라이브러리 설치
!pip install roboflow
from roboflow import Roboflow

# 데이터셋을 만들 때 트레인 안에 이미지/라벨, 검증 안에 이미지/라벨 구조로 들어가 있어야 함! (test는 필수가 아님)
rf = Roboflow(api_key="유저마다 다른 api_key")
project = rf.workspace("ilyes-talbi-ptwsp").project("futbol-players")
version = project.version(7)
dataset = version.download("yolov8")
→ 해당 데이터셋 가져올 때는 Roboflow 사이트 에서 데이터셋 주피터 코드로 복사
# 모델링 라이브러리 설치하기
!pip install ultralytics

# 라이브러리 불러오기
from ultralytics import YOLO, settings

# 데이터셋 경로 수정 & YAML 파일 경로 수정
settings['datasets_dir'] = '/content/'
settings.update()

import yaml
# yaml 파일에서 train, val 데이터셋 경로를 ./train/images & ./val/images로 변경
# data.yaml에 써져있는 경로는 yaml파일이 현재 있는 디렉토리를 기준으로 더 타고 들어가는 경로이기 때문에
# 아래는 경로 수정 코드 or 직접 파일 열어서 수정도 가능!

with open('/content/futbol-players-7/data.yaml', 'r+') as f:
    film = yaml.load(f, Loader=yaml.FullLoader)
    # display(film)
    film['train'] = './train/images/'
    film['val'] = './valid/images/'

with open('/content/futbol-players-7/data.yaml','w') as f:
    yaml.dump(film, f)
# 모델 구조 및 사전 학습 가중치 선택 model_transfer = YOLO(model='yolov8n.pt', task='detect') # 모델 학습, nc는 클래스 수 model_transfer.train(data='/content/futbol-players-7/data.yaml', epochs=20, patience=5, seed=2024, pretrained=True, ) # 파일 이미지 경로 복붙 image_path = '이미지 파일 경로' # 아래 코드 실행 시 runs 파일에 train 폴더에 모델링 결과 이미지 저장됨 model_transfer.predict(source=image_path, save=True, conf=0.1, iou=0.9 )CIFAR-10 실습
!pip install -- upgrade keras   # 케라스 버전 업그레이드 3.2.1

# 딥러닝 라이브러리 중 하나인 tensorflow 사용할 때 필요한 것, 환경 변수 설정, Pytorch, JAX도 가능
import os
os.environ['BACKEND'] = 'tensorflow'
데이터 전처리
# 라이브러리 설치
import numpy as np
import pandas as pd
import matplotlib.pyplot as plt

import keras

# keras에서 제공하는 cifar-10 데이터셋을 로드하는 코드, 10가지 클래스로 구성된 이미지 데이터셋
(train_x, train_y), (test_x, test_y) = keras.datasets.cifar10.load_data()

# train_x는 32*32*3 (컬러), train_y에는 class 개수가 들어가있음
train_x.shape, train_y.shape, test_x.shape, test_y.shape  # ((50000, 32, 32, 3), (50000, 1), (10000, 32, 32, 3), (10000, 1)) 출력

# 이미지별 라벨링
labels = {0: 'Airplane',
          1: 'Automobile',
          2: 'Bird',
          3: 'Cat',
          4: 'Deer',
          5: 'Dog',
          6: 'Frog',
          7: 'Horse',
          8: 'Ship',
          9: 'Truck'}

# 스케일링 (이미지의 각 픽셀은 0부터 255까지의 값을 가짐 -> 이 값을 0에서 1사이의 범위로 변환하는 과정)
train_x = train_x / 255.
test_x = test_x / 255.
모델링
# 라이브러리 불러오기
import pandas as pd
import numpy as np
import matplotlib.pyplot as plt
import seaborn as sns
import random as rd
import cv2, os  # cv2 : OpenCV

from sklearn.metrics import *

from keras.models import Sequential
from keras.layers import Dense, Flatten, Conv2D, MaxPooling2D
from keras.backend import clear_session
from keras.optimizers import Adam
# 메모리 청소 clear_session() # 모델링, input_shape에 x가 들어가야 함! model = Sequential([Flatten(input_shape=(32, 32, 3)), # Flatten으로 3차원데이터를 평평하게 만들어야 함 Dense(32, activation='relu'), # Dense 설정 시에는 보통 2의 배수로 Dense(64, activation='relu'), Dense(128, activation='relu'), Dense(10, activation='softmax')]) # 다중분류에서 마지막 output Dense는 클래수 개수! model.summary() model.compile(optimizer='adam', loss= 'sparse_categorical_crossentropy', metrics=['accuracy']) # 보조로 정확도도 함꼐 확인 history = model.fit(train_x, train_y, epochs = 20, validation_split=0.2).history # 성능예측 pred = model2.predict(test_x) pred_labels2 = np.argmax(pred, axis=1) # argmax는 값이 가장 높은 것의 인덱스를 가져와줘! print(confusion_matrix(test_y,pred_labels2)) print(classification_report(test_y,pred_labels2)) # 에포크 너무 많아서 중간에 멈추려면 Early Stopping from keras.callbacks import EarlyStopping es = EarlyStopping(monitor='val_loss', # 얼리스토핑을 적용할 관측 지표 min_delta=0, # 임계값 patience=5, # 성능 개선이 발생하지 않았을 때, 몇 epochs 더 지켜볼 것인지 verbose=1, # 몇 번째 epochs에서 얼리스토핑이 되었는가 알려줌 restore_best_weights=True # 최적의 가중치를 가진 epoch 시점으로 가중치를 되돌림 )모델링 (CNN, Conv2D와 MaxPooling2D 추가)
- Conv2D 와 MaxPooling2D를 추가하면 모델의 성능이 더 좋아짐!
# 스케일링 train_x = train_x / 255. test_x = test_x / 255. # 모델링 model2 = Sequential([Conv2D(16, kernel_size=(3,3), input_shape=(32,32,3), padding = 'same', strides = (1,1), activation= 'relu'), MaxPooling2D(pool_size=(2,2)), Conv2D(32, kernel_size=3, padding='same', activation='relu'), MaxPooling2D(pool_size=2), Flatten(), Dense(64, activation='relu'), Dense(10, activation='softmax') ]) model2.summary() # 학습 model2.compile(optimizer=Adam(0.0001), loss='sparse_categorical_crossentropy') history = model2.fit(train_x, train_y, epochs = 5, batch_size = 64, validation_split=0.2).history # 성능예측 pred = model2.predict(test_x) pred_labels2 = np.argmax(pred, axis=1) print(confusion_matrix(test_y,pred_labels2)) print(classification_report(test_y,pred_labels2))'KT 에이블스쿨 복습' 카테고리의 다른 글
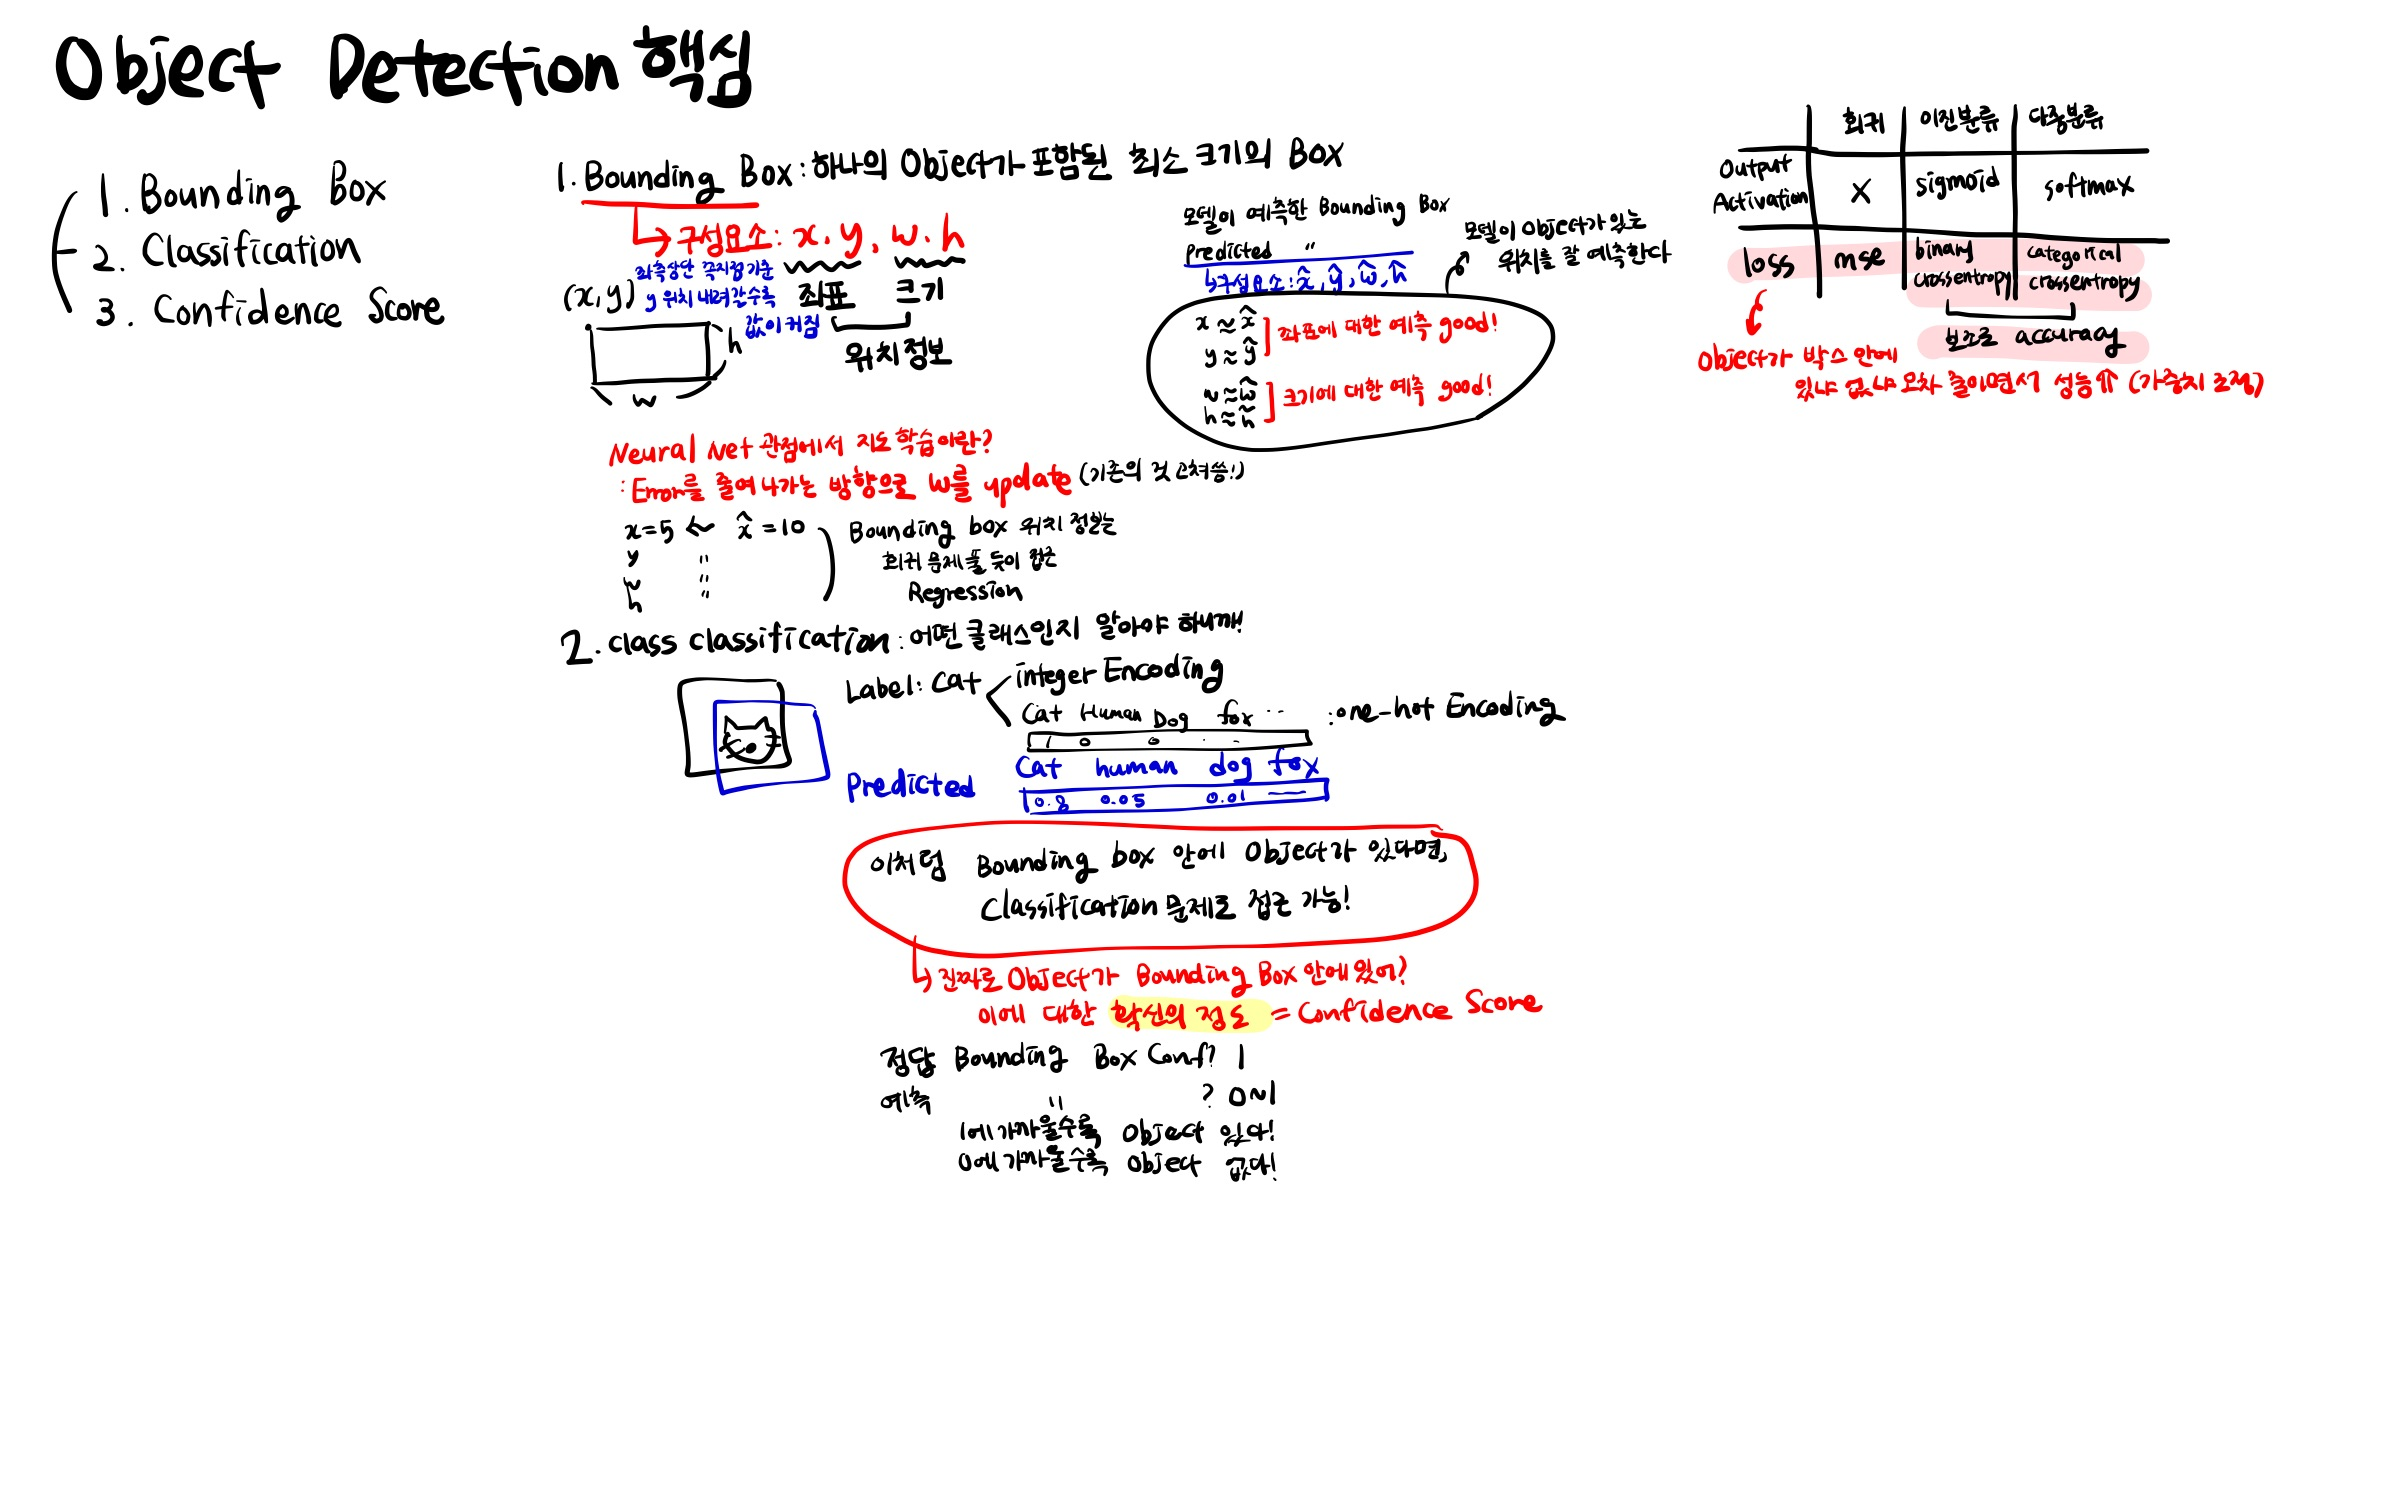
데이터 전처리, 딥러닝 모델링 텐서플로우 콜백 tensorflow 파이썬 코드 짜기$ (0) 2024.04.23 [0419 복습] 딥러닝_언어 모델 활용_transformer (GPT, BERT) (1) 2024.04.20 [0416 복습] 딥러닝 심화_Object Detection, Bounding Box, Class Classification, Confidence Score, IoU, NMS, Precision, Recall, AP,mAP, Annotation (0) 2024.04.16 [0415 복습] 딥러닝 기초_딥러닝 개념, 회귀 모델링, 이진분류, 다중분류, CNN 등 (0) 2024.04.15 [0402 복습] 앙상블 (보팅, 배깅, 부스팅, 스태킹) (0) 2024.04.03